破損ベンチマーク
はじめに
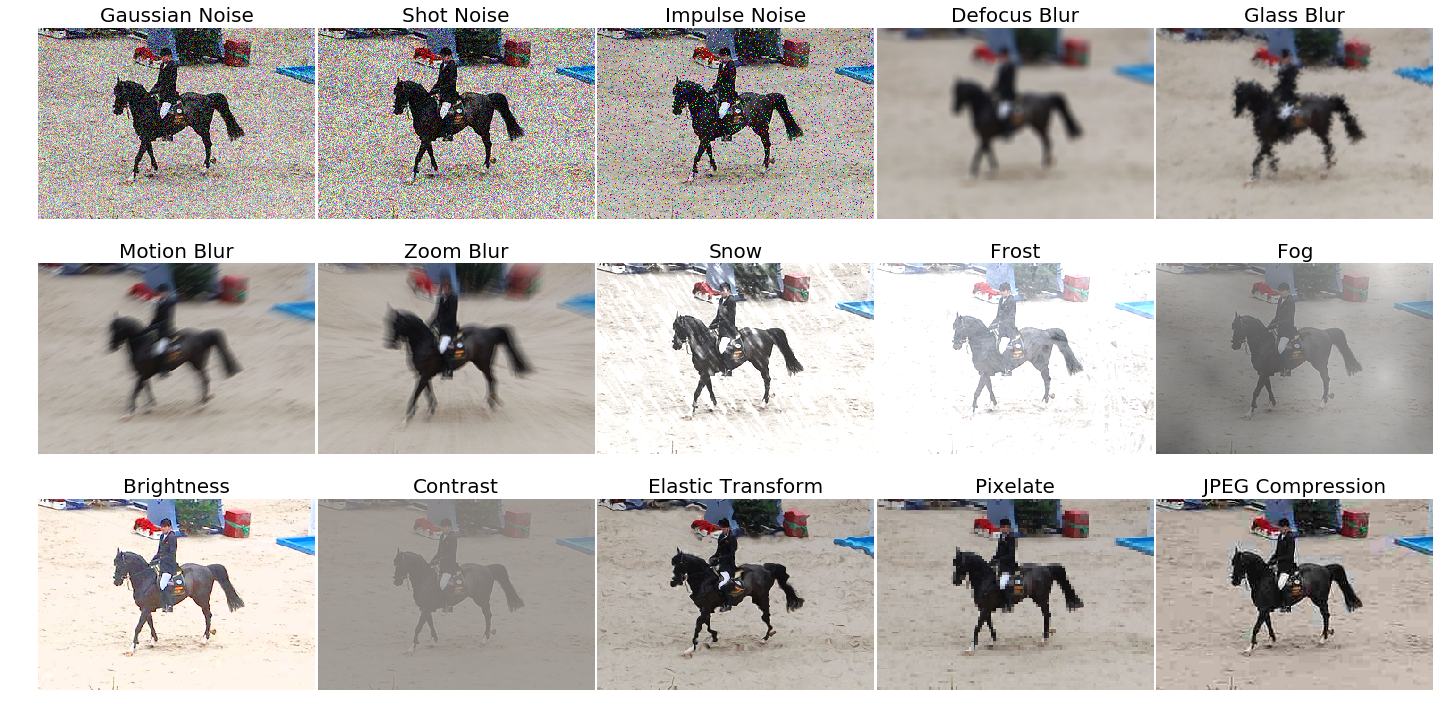
物体検出におけるロバスト性のベンチマーク:冬が来るときの自動運転で定義されている画像破損ベンチマークで、物体検出とインスタンスセグメンテーションモデルをテストするためのツールを提供します。このページでは、ベンチマークの基本的な使い方を説明します。
@article{michaelis2019winter,
  title={Benchmarking Robustness in Object Detection:
    Autonomous Driving when Winter is Coming},
  author={Michaelis, Claudio and Mitzkus, Benjamin and
    Geirhos, Robert and Rusak, Evgenia and
    Bringmann, Oliver and Ecker, Alexander S. and
    Bethge, Matthias and Brendel, Wieland},
  journal={arXiv:1907.07484},
  year={2019}
}

ベンチマークについて
ベンチマークに結果を提出するには、ベンチマークのホームページをご覧ください。
ベンチマークは、imagenet-cベンチマークをモデルにしており、もともとはDan HendrycksとThomas Dietterichによる一般的な破損と摂動に対するニューラルネットワークのロバスト性のベンチマーク(ICLR 2019)で公開されました。
画像破損関数はこのライブラリに含まれていますが、以下を使用して個別にインストールすることもできます。
pip install imagecorruptions
imagenet-cと比較して、任意のサイズとグレースケール画像の処理のためにいくつかの変更を行う必要がありました。また、「モーションブラー」と「雪」の破損を、別々にインストールする必要があったLinux固有のライブラリへの依存関係を削除するように変更しました。詳細については、imagecorruptionsリポジトリを参照してください。
事前学習済みモデルによる推論
ベンチマークで提供されている破損の任意の組み合わせでモデルのパフォーマンスを評価するためのテストスクリプトを提供します。
データセットのテスト
[x] 単一GPUテスト
[ ] 複数GPUテスト
[ ] 検出結果の可視化
次のコマンドを使用して、ベンチマークで使用される15種類の破損に対するモデルのパフォーマンスをテストできます。
# single-gpu testing
python tools/analysis_tools/test_robustness.py ${CONFIG_FILE} ${CHECKPOINT_FILE} [--out ${RESULT_FILE}]
または、異なるグループの破損を選択することもできます。
# noise
python tools/analysis_tools/test_robustness.py ${CONFIG_FILE} ${CHECKPOINT_FILE} [--out ${RESULT_FILE}] --corruptions noise

# blur
python tools/analysis_tools/test_robustness.py ${CONFIG_FILE} ${CHECKPOINT_FILE} [--out ${RESULT_FILE}] --corruptions blur

# wetaher
python tools/analysis_tools/test_robustness.py ${CONFIG_FILE} ${CHECKPOINT_FILE} [--out ${RESULT_FILE}] --corruptions weather

# digital
python tools/analysis_tools/test_robustness.py ${CONFIG_FILE} ${CHECKPOINT_FILE} [--out ${RESULT_FILE}] --corruptions digital
または、カスタムの破損セット(例:)
# gaussian noise, zoom blur and snow
python tools/analysis_tools/test_robustness.py ${CONFIG_FILE} ${CHECKPOINT_FILE} [--out ${RESULT_FILE}] [--eval ${EVAL_METRICS}] --corruptions gaussian_noise zoom_blur snow
最後に、評価する破損の強度を選択できます。強度0はクリーンなデータに対応し、1から5に増加するにつれて効果が増加します。
# severity 1
python tools/analysis_tools/test_robustness.py ${CONFIG_FILE} ${CHECKPOINT_FILE} [--out ${RESULT_FILE}] [--eval ${EVAL_METRICS}] --severities 1

# severities 0,2,4
python tools/analysis_tools/test_robustness.py ${CONFIG_FILE} ${CHECKPOINT_FILE} [--out ${RESULT_FILE}] [--eval ${EVAL_METRICS}] --severities 0 2 4
modelzooモデルの結果
COCO 2017valの結果を以下の表に示します。
| モデル | バックボーン | スタイル | Lr schd | box AP クリーン | box AP 破損 | box % | mask AP クリーン | mask AP 破損 | mask % |
|---|---|---|---|---|---|---|---|---|---|
| Faster R-CNN | R-50-FPN | pytorch | 1x | 36.3 | 18.2 | 50.2 | - | - | - |
| Faster R-CNN | R-101-FPN | pytorch | 1x | 38.5 | 20.9 | 54.2 | - | - | - |
| Faster R-CNN | X-101-32x4d-FPN | pytorch | 1x | 40.1 | 22.3 | 55.5 | - | - | - |
| Faster R-CNN | X-101-64x4d-FPN | pytorch | 1x | 41.3 | 23.4 | 56.6 | - | - | - |
| Faster R-CNN | R-50-FPN-DCN | pytorch | 1x | 40.0 | 22.4 | 56.1 | - | - | - |
| Faster R-CNN | X-101-32x4d-FPN-DCN | pytorch | 1x | 43.4 | 26.7 | 61.6 | - | - | - |
| Mask R-CNN | R-50-FPN | pytorch | 1x | 37.3 | 18.7 | 50.1 | 34.2 | 16.8 | 49.1 |
| Mask R-CNN | R-50-FPN-DCN | pytorch | 1x | 41.1 | 23.3 | 56.7 | 37.2 | 20.7 | 55.7 |
| Cascade R-CNN | R-50-FPN | pytorch | 1x | 40.4 | 20.1 | 49.7 | - | - | - |
| Cascade Mask R-CNN | R-50-FPN | pytorch | 1x | 41.2 | 20.7 | 50.2 | 35.7 | 17.6 | 49.3 |
| RetinaNet | R-50-FPN | pytorch | 1x | 35.6 | 17.8 | 50.1 | - | - | - |
| Hybrid Task Cascade | X-101-64x4d-FPN-DCN | pytorch | 1x | 50.6 | 32.7 | 64.7 | 43.8 | 28.1 | 64.0 |
破損の確率的な適用により、結果がわずかに異なる場合があります。